|
|
|
command line options
|
Running "baudline -help" prints out this list of command line options.
usage:   baudline [-options ...] optional_file.wav

-help                Print this message and exit.
-version             Print version of baudline and exit.
-display hostname:0  Remote X server to contact and display on.
-geometry #x#+#+#    Size and Position of main spectro window.
-bg color            Background color.
-fg color            Foreground color.
-iconic              Start with the spectro window iconified.
-root                Spectrogram only display in root window.
-realtime            Activate real-time kernel scheduling.
-threads number      Number of DSP engine processing threads.
-pipeline number     Size of the DSP work queue pipeline.

-modifier key        key = {ctrl alt meta}, default = alt
-spacebar mode       Toggle mode = {off stop recordpause recordplay playpause}
-palette filename    Load custom color palette (format RGB text file).
-utc time            Set UTC time in YYYY:MM:DD-HH:MM:SS.uuuuuu format.
-noise dB            Enable noise impairment to output paths {0 ... -132}

-reset               Reset to the default configuration settings.
-session name        Use session 'name' for configuration settings.
-csession name       Like -session but add unique color icons.
-tsession name       Like -csession but add (name) to window titles.

-pause               Start baudline in pause mode.
-play                Start baudline in play mode if file is loaded.
-record              Start baudline in record mode.

-operation           Set mapping {none invert absolute delta xor ...}
-transform           Set mapping {fourier autocorrelation bitraster ...}
-space               Set mapping {magnitude phase linear logarithmic ...}
-quadrature          Enable complex I/Q display analysis.
-flipcomplex         Swap I and Q channels when doing -quadrature.
-monet               Enable surround extraction display analysis.

-psd                 Replace axis dB with PSD units volts^2/Hz.
-reversetimeaxis     Reverse time axis direction for recording.

-memory number       Megabytes of memory to use for buffers.
-fftsize number      Transform size {128 256 512 1024 2048 4096 ...}
-overlap number      Sliding overlap percentage {1 ... 100}
-slidesize number    Sliding overlap number of samples.
-samplerate number   Set sample rate.
-decimateby number   Set value to decimate by.
-decimategain dB     Set decimation filter gain.
-calibratesr ppm     Calibrate sample rate with this PPM correction.
-basefrequency Hz    Set baseband DC center frequency.

-mixer  number       Manual mapping of mixer to audio device
-mixer1 number       where -mixer# represents /dev/mixer# and
-mixer2 number       number represents /dev/audio#
-mixer3 number
-mixer4 number

-devaudio  channel   Set and enable an input card # from the
-devaudio1 channel   specified channel type.
-devaudio2 channel
-devaudio3 channel
-devaudio4 channel   values = {off mic line CD digital2 line3 ...}

-devtone             Enable Tone Generator as an input device.
-fullduplex          Map all audio devices to be full duplex.

-stdin               Enable standard input as the only input.
-channels number     Number of channels for stdin, default = 1
-format type         Sample format {alaw ulaw s8 u8 le16 be16 le32f be32f}
-scaleby float       Scale by factor for floating point formats.
-stdout              Enable standard output.

-infrags number      Input buffering, # of fragments 0=maximize
-outfrags number     Output delay, # of fragments 0=maximize
-fragsize number     Fragment size in bits.
-brokentrigger       Audio driver trigger is broken, do prime.

-overlays number     Number of colors per position (RGB default = 3)
-verticalsync number Set the vertical sync refresh rate in Hz.
-jumpstep number     Set the FPS jump step parameter.
-xslip number        Set the throttling xslip parameter.
-overclock           Experimental, overclock the fragment rate.
-backingstore        Enable winwin copy speed optimization.

-nobackingstore      Disable backing store optimization.
-nodoublebuffer      Disable video display double buffering.
-nodither            Disable dither for quantization conversions.

-sysinfo             Probe and print system hardware resources.
-debug               Print startup and general debug messages.
-debugfragments      Print out a stream of fragment data.
-debugcadence        Print out a stream of cadence slice data.
-debugjitter         Print out a stream of jitter timing data.
-debugrate           Print out a stream of sample rate tracking data.
-debugmeasure        Print out a stream of measurement data.
-debugtimer ms       Milliseconds between debug rate and measure lines.

-average             Popup average window.
-histogram           Popup histogram window.
-playdeck            Popup play deck window.
-scrollcontrol       Popup scroll control window.
-stats               Popup stats window.
-tonegenerator       Popup tone generator window.
-waveform            Popup waveform window.
-peakhold            Enables spectrum smoothing with decay hold.
|
|
|
|
-display |
Baudline can be run remotely and use X11 to display its window contents over a
network connection. The -display command line option sets the
remote X server to contact and display on. The parameters are "-display
hostname:0" where hostname is the name of the machine to display and :0 is
the display number. This is equivalent to setting the $DISPLAY
environment variable with the following command:
setenv DISPLAY hostname:0
Many .login scripts set this environment variable when you rlogin in.
Note that the -display command line option overrides the $DISPLAY
environment variable. Also the hostname of your remote machine might
need to be added to the X server access list on the display machine.
This can be accomplished with the command "xhost +" which grants access to
everyone or "xhost +remotename" where remotename is the name of the remote
machine that baudline is running locally on.
Baudline's display can be tunneled over a secure connection with "ssh -C -X
host" where the -C option requests data compression which is useful for
slow links. Also of interest is streaming the raw samples over a network
channel, for details see the -stdin and
-stdout command line options.
|
|
|
|
-realtime |
Activate real-time kernel scheduling for baudline by using the SCHED_RR (round
robin) option. Potential performance improvements include: smoother frame
rates, fewer xruns, and more deterministic
operation. Combining the -realtime command line option with a real-time
(RT) kernel has the potential to improve performance even more.
Necessary permissions are required to be able to change the scheduling
policy. This can be accomplished by running as root or by installing a
scheduling kernel patch that is designed for JACK RT operation.
For more information on real-time kernel scheduling and SCHED_RR see:
|
|
|
|
-threads |
Set the number of DSP engine processing threads. Baudline automatically
selects the optimal value. This command line option is useful for testing
and benchmarking the performance of different thread configurations.
Mono-core systems default to a special 0 thread mode which is more efficient
than the 1 thread configuration. Multi-core systems default to having
the same number of threads as there are cores. A maximum of up to 32
cores are supported.
|
|
|
|
-pipeline |
|
Set the pipeline size of the DSP work queue. Baudline automatically
selects the optimal value which is equal to twice the number of threads.
Different values can be manually set for benchmark testing and performance
tuning purposes. The -threads value must be
greater than 0 for this option to be effective. The maximum pipeline
value is 64.
|
|
|
|
-modifier |
Set the command key shortcut modifier (example: Alt+O for the open file
dialog). On Linux, FreeBSD, and Solaris the default setting is the Alt
key. On Mac OS X the default setting is Meta which is the Apple Command
key. The possible settings are:
|
|
|
|
-spacebar |
Use the "space bar" to perform special stop or cyclic run mode changing
actions. The possible toggle mode settings are:
- off
- stop
- recordpause
- recordplay
- playpause
For example with the command "baudline -spacebar playpause",
pressing the space bar will toggle baudline between the Play and the Pause
modes which would be useful for repeating listening tests. With the
"stop" option a space bar press will switch baudline into the Pause
mode. The default value is "off" which means all space bar presses are
ignored.
|
|
|
|
-utc |
Set the baudline UTC time in
YYYY:MM:DD-HH:MM:SS.uuuuuu format where YYYY is years, MM is months, DD is
days, HH is hours, MM is minutes, SS is seconds, and .uuuuuu is
microseconds. This command sets the time reference of the first sample
(0 ms) when a file is loaded or a record is started. This command line
option is designed to be used in conjunction with the
UTC time measurement window.
Normally a script would set the -utc option. Either a stable time
reference like the GPS clock would be used for live recording, or a historic
time stamp would be used if the signal source is a database archive system.
Note that leap seconds are currently ignored. The last leap second was
introduced at midnight December 31 2005.
The command "-utc 0" is a special shortcut option for setting a zero reference
time baseline for either recording or file loading. It is equivalent to
typing "-utc 0000:01:01-00:00:00.000000" manually.
|
|
|
|
-session |
| Baudline is a fully session-aware application
that can save and restore its system state. This means baudline can
start up in exactly the same state it was in when it was last closed.
Details such as which windows were open, window geometry, window positions,
scroll bar values, zoom levels, devices enabled, sample rates, and many
other miscellaneous parameter settings are all remembered. There are four
types of session methods that are important to understand.
baudline (no session options)
Starting up baudline without any session options will cause
the run commands (rc) in the ~/.baudline/baudline_rc file to be loaded and
processed. If the _rc file doesn't exist, baudline will use its default
configuration, and the _rc file will be created when the program is
closed. Any configuration details that are changed while running
baudline will be saved on program exit. Note that any command
line options will override the same command option in the _rc file.
It is not recommended to edit the baudline_rc file, however, since it is a
text file, the advanced user may wish to look it.
baudline -session name
Named sessions can create custom configurations for specific
tasks such as Netscape or
Konqueror file loading, long
term low frequency bass environmental analysis, scientific experiments, and
test bench setups. Instead of loading and processing the baudline_rc
file, the file ~/.baudline/session/name is loaded and processed. The
file "name" can be any legal UNIX filename. If there isn't a file
in the ~/.baudline/session/ directory called "name", the baudline_rc file
will be loaded, and if that doesn't exist baudline will fallback to using
the default configuration settings. All configuration details, including
any parameters changed while running, will be saved in the session file on
program exit. Note that any command line options will override the
matching option in the session file.
baudline -csession name
baudline -tsession name
Are subsets of the -session command line option whose purpose is to make it
easier to distinguish between multiple running baudline sessions. Use
only one of the { -session, -csession, -tsession } options at a time. The
-session option uses the standard baudline purple and green icon scheme.
The -csession option is like -session but it adds unique color icons to every
window. The binary color combinations are a function of the first letter
of the session name. The -tsession option is like -csession with its
unique color icons but it also adds the session (name) to all window
titles.
baudline -reset
This command line option resets
baudline to its default configuration settings. No baudline_rc or session
file is loaded. Returning to a baseline setup is a useful thing to
do for a number of reasons. If baudline is behaving oddly and you suspect
it might be due to your accidental setting of some obscure parameter, do a
-reset and baudline will start up with a clean slate. If you like
starting up baudline with several command line options, from a script or
another program for example, doing a -reset will anchor all of your options to
a baseline state so that repeatability and a certain level of control can be
achieved. Note that when running baudline with both the -reset and
-session options, the -reset option overrides the -session option at startup by
using the default configuration settings, and then at program exit any changes
are saved to the named session file.
X Session Management Protocol (XSMP)
Session managers such as Gnome's
sawfish and KDE2's kwin are XSMP enabled which means when you log back in
all your windows are exactly in the same state they were when you logged
out. Note that any loaded file is also remembered unlike the above
session methods.
|
|
|
|
-operation |
Set the preferred channel mapping
operation. The default
operation is none. Possible -operation options are:
- none
- invert
- absolute
- reciprocal
- sqrt
- square
- cube
- quad
- logarithm
- clip
- delta
- absdelta
- -hz
- hilbert
- bits
- reverse
- endian
- addition
- subtraction
- multiplication
- division
- modulus
- xor
- magnitude
- phase
Note that quotation marks around the "-hz" option might be required depending
on your shell (sh, csh, tcsh, bash, ...).
|
|
|
|
-transform |
Set the preferred channel mapping
transform. The default
transform is Fourier. Possible -transform options are:
- off
- fourier
- blipfourier
- complexfourier
- fourierratio
- transferfunction
- impulseresponse
- autocorrelation
- crosscorrelation
- bitraster
- sampleraster
- histogram
|
|
|
|
-space |
Set the preferred channel mapping
space. The default
space is magnitude. Possible -space options are:
- magnitude
- magnitude'
- magnitude''
- magnitude'''
- phase
- phasedelay
- groupdelay
- real
- imaginary
- linear
- logarithmic
- agclinear
- agclog
Note that quotation marks around the "magnitude'" derivative options might be
required depending on your shell (sh, csh, tcsh, bash, ...).
|
|
|
|
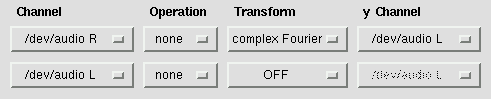
-quadrature |
| The quadrature command line option
instructs baudline to treat every pair (multiple of 2) channels as a complex
signal. The left and right channels of a stereo signal would be treated
as the in-phase (I) and quadrature (Q) components of a single complex signal
instead of the default case of two real signals. Note that with the
-quadrature option and an 8 channel file or 8 audio card inputs the
tasking will be to treat them as 4 complex signals. Four complex
inputs? Most users won't even have one complex input, but it's good to
know that if you did, then baudline would be flexible enough to handle
it.
The -quadrature command is just a convenience
feature. Baudline can be manually tasked by the input
channel mapping window
to perform complex Fourier transforms on any set of signals, live or
pre-recorded. The OFF transform allows the y Channel to be displayed in
the Waveform and Histogram windows and it also allows both channels of a
complex I/Q signal to be automatically saved. Look at the picture below
to see what exactly baudline is setting.

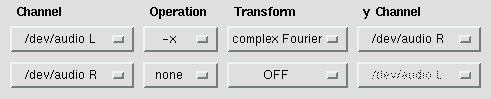
The -flipcomplex command
line option complements the -quadrature command by flipping the
in-phase (I) and quadrature (Q) components. With this option the left
channel of a stereo signal is mapped to the quadrature component and the right
channel is mapped to the in-phase component. This is a useful thing to
do if for some reason your I/Q lines are swapped. Funnily enough, this
happens about 50% of the time! Note that the -quadrature option
needs to be used in conjunction with the -flipcomplex option for the
operation to work correctly. Look at the picture below to see how
baudline tasks the channel mapping when the -flipcomplex option is on.
One might ask, what difference does it make which channel
is the in-phase (I) and which is the quadrature (Q) component? Intuition
says it shouldn't make a bit of difference, but it does. The Hilbert
viewpoint is that the quadrature part of a complex signal is just the in-phase
part phase shifted by 90°. So, swapping the I and Q axes, making it
Q/I, retards the phase shift instead of advancing it. Another way of correcting
the problem is to perform a polarity inversion on the in-phase channel.
This is equivalent to doing a 180° phase shift (-90 + 180 = +90). The
picture below with the -x operation is functionally similar to swapping
the I and Q parts with the -flipcomplex option.
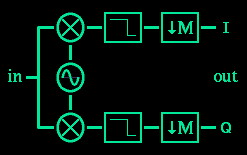 Down Mixer
The input device's down mixer normally
does a real-to-real baseband (0 Hz) down conversion. The
-quadrature option changes this behavior. It forces the down
mixer's output to be a quadrature (I/Q) signal. This can mean two
different things.
With a real (mono) input, a complex (I/Q) signal is created and mixed down to
baseband and the output is a quadrature signal. Real in, quadrature
out. This mode of operation can be used to create a quadrature signal
from a real signal. See the diagram on the right for a graphical
illustration.
To enable quadrature output with this mode the input device's decimation ratio
must be 2 or greater, otherwise the down mixer is bypassed and a real signal
is output. Note that because of quadrature sampling this extra level of
decimation does not cause any loss of signal. When used with the
tone generator's loopback
feature, baseband centered complex test signals can be created.
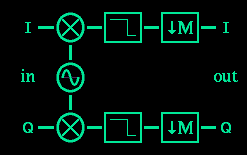
The other thing the -quadrature option can signify is with a quadrature
input, the signal pair is mixed down to baseband and the output is a quadrature
signal. Quadrature in, quadrature out. See the diagram on the
right for a graphical illustration.
In summary. Three distinct down mixer modes of operation are
possible. The -quadrature option adds the last two input/output
modes:
- real-to-real
- real-to-quadrature
- quadrature-to-quadrature
|
|
|
|
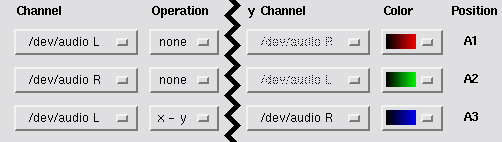
-monet |
| The Monet command line option is a
convenience function that automatically tasks the
channel mapping window
to display a stereo signal in a new and enlightening way. The left
and right channels are mapped as usual, but what is new, is an inter-channel
difference signal which performs a pseudo surround channel extraction.
Subtracting the right channel from the left channel (x - y) has the effect
of reducing mono signals and boosting surround signals that are matrix
encoded 180° out of phase. When fed a stereo signal with strong
surround elements the result is a blend of red, green, and blue overlays that
look like an impressionist painting, in our minds anyway, hence the name
Monet.
This picture shows how the -monet option tasks the channel
mapping settings.
|
|
|
|
-psd |
Power Spectral Density (PSD) is a method of scaling the spectra amplitude axis
such that it becomes a continuous function of frequency. Terms are
density per unit frequency (1 Hz) which is volts^2/Hz.
The psd command line option transforms the dB axis into the PSD axis
and the dBm axis into the amplitude axis. The intended purpose of this
transformation is to replace the relative 0 dB calibrated scale to an absolute
scale that more accurately represents the raw data. This option is also
known as the "strain axis" feature.
The label for the strain axis will be "PSD". The values of the PSD axis
will have the units of volts^2/Hz as defined by the formula:
PSD = log10((r*r+i*i) / (N*sample_frequency))
Where "r" and "i" are the raw FFT data. Note that prior to windowing and
the FFT the 16 bit samples will have the effect of being multiplied by the
1./scaleby correction factor in order to restore the original samples values.
This operation can be thought of as mapping the existing dB axis to the PSD
axis. Both axis are in log space and the shape of their curves are
identical. The only difference is in the actual numeric values.
Instead of the 0 dB to -136 dB range of the current dB axis, the PSD axis will
be a function of the -scaleby option and the range will
vary accordingly. The plotted spectrum and spectrogram displays will look
identical with or without the -psd option, only the ruler and measurement
values will be different.
The dBm axis of the Waveform and Histogram window will be changed to map to
the Amplitude axis. The ruler scale will be linear and the title will be
"amp". This axis will in effect be multiplied by "1./scaleby" which
will undo the initial quantization. The on-screen-display will display
the full value that the mouse is pointing to. The ruler is space limited
and it will display major ticks with the exponential power of 10 notation
(1e7, -3e5, +5e4, ...). A unique "z" notation will be used with negative
exponents, for example -3e-5 will be displayed on the ruler as -3z5.
|
|
|
|
-reversetimeaxis |
|
Reverse the time axis of the spectrogram and waveform windows. The
standard baudline mode of operation is for the time (0 ms) to be on the bottom
when in record mode and at the top when a file is loaded. This
-reversetimeaxis option flips the record case so that time (0 ms) is now at
the top. This means that the time axis will now scroll while
recording.
|
|
|
|
-calibratesr |
Manually calibrate the sample rate value with this PPM (parts per million)
correction factor. This command line option is used by the
sample rate estimation and calibration
feature. Usage is "-calibratesr ppm".
Formula:
ppm = (true_rate / requested_rate - 1.) * 1000000.
If you have an extremely accurate function generator (with a cesium or rubidium
clock) then baudline's highly accurate
Hz measurement windows can be used to
create a calibration factor. Simply substitute the input and
measured Hz with the true and requested rates in the
above PPM formula.
An insightful observation is how this value compares with the
NTP drift adjustment value. Both values
are in PPM. The NTP value is drift error of the main system clock.
The baudline value is the error of the ADC/DAC clock. Compare:
- cat /etc/ntp/drift
- cat /var/lib/ntp/drift
with
- cat ~/.baudline/baudline_rc | grep calibratesr
- cat ~/.baudline/session/name | grep calibratesr
|
|
|
|
-mixer |
Baudline has automatic /dev/mixer# to /dev/audio# mapping logic.
The simple case of a single solitary sound card presents no challenge, but
things start to get tricky when two or more sound cards are present.
Sometimes this logic isn't smart enough to correctly figure out the physical
mapping. When this happens the -mixer command line option can be
used to override the automatic mapping.
The format is "-mixer# number" where both "#" and "number" are values
from 0 ... 4 which represent /dev/mixer# and /dev/audio#. For example the
command "-mixer1 2" says map /dev/mixer1 to /dev/audio2. For trouble
shooting is it a good idea to check the -sysinfo output and the layout in the
input devices window.
We would like to hear from you if you happen to have a computer setup that
causes baudline's automatic mixer mapping to fail, meaning that it can't figure
out the correct map. Please send a short email describing the audio cards
in your setup, the correct map, and the text output from "baudline -sysinfo" to
us at the email address in the Contact link.
|
|
|
|
-devaudio |
This command lets you set the input device from the command line.
This can be a useful thing to do if you run baudline from scripts and require
some sort of external configurability. It is preferable to use the
-session option and set the device and channel input from baudline's
input devices window, but if you need to
you can do this from the command line.
The format is "-devaudio# channel" where # is a number from
0 ... 4 and channel is a string from the following list
{ off, microphone or mic, line, CD, digital1, digital2, digital3, line1, line2,
line3, phone_in, video, radio, and synthesizer }. The channel "off"
disables the input device. Only a small subset of this is supported by
each actual audio card.
|
|
|
|
-stdin |
From the stdin man page: "every Unix program has three streams opened for it
when it starts up, one for input, one for output, and one for printing
diagnostic or error messages." Standard input is a Unix mechanism that
allows any program output to be piped in as an input data stream.
Typically, it is used with programs like "grep" and "sort" but it can be used
with any program that writes output to stdout. The stdin, stdout, and
pipe are very powerful concepts.
Standard input can be selected as the only input stream by using the command
line option "baudline -stdin." Unfortunately, both standard input, and
audio card input or tone generator input, cannot be active at the same
time. There are three command line options that are -stdin
specific.
-channels #
The channels option allows you to select the number of input channels from 1 to
9. The default value is 1 channel (mono). Multiple channels have
interleaved data samples.
-format type
This option lets you choose the sample format. The default value is
le16 (16 bit little endian). The following table lists the possible PCM
formats:
| command |
description |
| alaw |
A-Law companding |
| ulaw |
u-Law companding |
| s8 |
linear 8 bit signed |
| u8 |
linear 8 bit unsigned |
| le16 |
linear 16 bit signed little endian (default) |
| be16 |
linear 16 bit signed big endian |
| le32f |
32 bit float little endian |
| be32f |
32 bit float big endian |
-scaleby #
When one of the floating point -format modes (le32f, be32f) are
selected, the stdin floating point samples will be multiplied by the
-scaleby option and then quantized to fit into a 16 bit signed
integer. The purpose of the scaleby option is to choose which bits should
be kept and which should be discarded. This could lead to oversaturation
for high energy samples, such samples will be clamped to either +32768 or
-32767.
Note that the -scaleby option will operate as a 1./scaleby correction on files
loaded from the standard Open File and the Raw Parameters windows thus
overriding the "auto measure" option.
The scaleby option accepts a floating point value and the default value is 1.
(unity). If the floating point samples are in the domain {-1., +1.} then
the proper scaling command would be "-scaleby 32767."
Here are some interesting examples of how to use the standard input option in
baudline :
- cat /dev/mem | baudline -stdin -overlap 100 -record
- rsh remote_machine 'cat /dev/audio' | baudline -stdin -format ulaw -record
- sun_echo m320 | baudline -stdin -format alaw -samplerate 8000 -record
- mpg123 -s http://netcast.kfjc.org:80/x.mp3 | baudline -stdin -channels 2 -samplerate 16000 -overlap 15 -record
[Update December 2004]
The command "cat /dev/mem" is broken in the Linux 2.6 kernel. Use "cat
/proc/kcore" instead. Unfortunately kcore also includes the swap space
so dumping it will cause heavy disk usage.
|
|
|
|
-stdout |
This command line option enables standard output which is a Unix mechanism
for piping program output to the inputs of other programs. See -stdin for more information. Baudline's
-stdin and -stdout options can be used together to create some
very interesting and useful data flow streams.
The data format is 16 bit linear samples that are interleaved in the case of
multiple channels. The stdout pipe will block when full so any prolonged
blockage on the sink side may result in dropped audio input or output data
depending on the stdout mode of operation.
modes of operation
- Record mode. All recorded channels (including -stdin and the
tone loopback if enabled) will be streamed to stdout. The output stream
samples will be interleaved if more than one channel is active.
- Play mode. Audio will be output to the /dev/audio devices and
will also be streamed to stdout in stereo (2 channel interleaved). Note
that the stdout data is post Play Deck meaning that all speed, scale, shift,
filtering, phono scratching, and panning will be performed on the samples prior
to streaming to stdout.
- Record or Play mode. Manually select stdout in
the Tone Generator or the Play Deck. Sample data will only be sent to the
stdout pipe and not the audio device. The stream will be stereo (2
channel) and it will be free-running (not clocked) which means it will send
data to stdout as fast as the sink can consume it. Note that this mode
overrides all other stdout modes.
- Pause mode. Alt+| paste a selected section of sample data to
stdout. This stdout paste command pops up the
progress bar window which
displays the current status of the operation.
Here are some interesting examples of how to use the standard output option in
baudline:
- baudline -stdout > file.raw
- baudline -stdout | gzip > file.raw.gz
- baudline -stdout | oggenc -Q -r - > file.ogg
- baudline -session a -stdout | baudline -session b -stdin
- baudline -session a -stdout | baudline -session b -stdin -stdout | baudline -session c -stdin
- ...
- mkfifo fifo
- tail -c 4096 prime_file.wav | cat - fifo | baudline -session infinite_loop -stdin -stdout >! fifo
|
|
|
|
-jack |
Use the jack command line option for a quick setup of the JACK Audio
Connection Kit as baudline's default audio device. This is equivalent to
manually enabling JACK in the Input and Output Device windows. The JACK
settings are stored in the session variables so the -jack option only needs to
be used once. Note that the sample rate is determined by the JACK server.
-channels #
The channels option allows you to select the number of input and output
channels from 1 to 9. This is equivalent to manually setting the number
of channels in the Input and Output device windows.
-jackd name
Specify the JACK Audio Connection Kit server name that baudline should connect
to when more than one instance of jackd is running. Multiple jackd's are
useful when multiple sound cards are used. Most users will not need to
use this command line option.
-inconnect name
Connect the JACK input to this output client. This is equivalent to
manually selecting the JACK client name from the option menu in the Input
Devices window. The default action is to connect to the alsa_pcm
client. Here is an example of how to use it:
-outconnect name
Like the -inconnect option but connect the JACK output to this input client.
Baudline's client connection and patch channel controls are useful for most
general purpose setups. For more sophisticated and flexible control a
program such as qjackctl should be used. Baudline's JACK connection
controls can work in harmony with qjackctl but it might be more convenient to
set the baudline connections to OFF and do all patching externally.
Here are some examples on how to use the JACK command line options:
- baudline_jack -jack
- baudline_jack -jack -channels 2 -inconnect xmms
- baudline_jack -jack -channels 1 -outconnect baudline
- baudline_jack -jack -channels 4 -inconnect ardour -outconnect jamin
- baudline_jack -jack -channels 9 -inconnect OFF -outconnect OFF
|
|
|
|
-brokentrigger |
|
The brokentrigger command line option is a flag which informs baudline
that the audio driver trigger start mechanism (SNDCTL_DSP_SETTRIGGER) is broken
and a data priming is required. The purpose of this command is to reduce
the stalling when a record operation begins. Read this
SB Live! and this
via_82cxxx
FAQ entry to learn more about the -brokentrigger option.
|
|
|
|
-overlays |
|
The overlays command line option lets you change the number of colors per
position that are automatically tasked in the input
channel mapping
window. Valid values are {1, 2, 3}. For 16 and 24 bit graphics
the default value is 3 which corresponds to a
RGB overlay plane. For 8 bit graphics
the default value is 1. Using "-overlays 1" with 16 bit graphics will
automatically task just one green pane per position which is the same behavior
that that 8 bit has. Note that using the -overlays option will affect
both the maximum number of channels that baudline can display and load from a
file.
|
|
|
|
-backingstore |
By default XFree 4.x.x has backing store turned off. For maximum
baudline performance the backing store feature should be enabled. For
information on how to enable it see this
FAQ entry.
Backing store is a feature in the X Server that maintains window contents when
a window is obscured. When the window, or section of it, is uncovered the
X server automatically and quickly repaints it. With today's modern
machines this feature is not that expensive in terms of memory usage and it is
only engaged by applications that specifically ask for it, and only a few
do. Turning on backing store will have minimal effect on memory usage,
so there really is no reason to keep it turned off.
When your X Server has backing store enabled baudline will automatically
detect it and use it. Nothing more is required for maximum performance.
When your X11 Server has backing store disabled baudline will revert
to using slower pixwin copies for the main scrolling spectrogram window.
Doing so will result in about a 3X performance hit to the scrolling frame rate
that will dramatically reduce smoothness. The benefit of doing this is
100% video integrity and no more popup ghosting. It is a quality vs.
speed tradeoff.
Note that because of this new behavior the old "-nobackingstore" option is now
no longer useful for general use. For the special case of using the
-root wallpaper option when your window manager happens to have a toolbar
that obstructs the root display, like KDE1's kwm, the -nobackingstore might be
useful in producing correct wallpaper scrolling.
For those who wish to retain the old artifact prone but faster and smoother
scrolling baudline behavior the "-backingstore" command line option was
created. Using the option will force baudline to perform the faster
winwin copies. Most people will not want to use this command.
|
|
|
|
-nodoublebuffer |
Disable the video display double buffering feature. This option will
increase display flicker but it will also reduce video bandwidth consumption
which can increase the frame rate (FPS) on
older computers.
The baudline default is for double buffering to be enabled. The purpose
of this command line option is to be a way to restore the old behavior.
|
|
|
|
-nodither |
Dither is enabled by default. The no dither command line option disables
it and instead uses a pure rounding rule when performing quantization.
Dither is a feature that reduces quantization noise when doing 16 bit sample
conversions. It works by adding a small amount of noise to a signal
before it is quantized (32 bit -> 16 bit). This may at first seem like
a bad thing to do but it is in fact quite beneficial. Dither has the
effect of reducing harmonic distortion. The addition of dither can also
improve weak signal detection in specific quantization scenarios. In
baudline dither can apply to stdin, the Tone Generator, audio output, and
file loading.
In normal operation it is not recommended that dither be disabled.
Although, disabling dither can be useful for educational purposes. Try
enabling the tone generator loopback in the Input Devices window and setting
the Tone Generator to a clean unmodulated sine wave with a frequency that
is an integer ratio of the sample rate. For example: a 1 kHz sine wave
with a 8000 sample/second rate. Now try the same thing with the -nodither
command line option. Notice the large amounts of harmonic
distortion? Another experiment to try is lowering the digital gain of
the Tone Generator to -132 dB, make note of the power of the weak
signal. When you try the same thing with the -nodither option the
signal will be completely gone.
|
|
|
|
-debugrate |
Print out a stream of sample rate estimation data to stderr. This option
is useful for logging the
sample rate estimates to a file with
a command like:
- baudline -debugrate >& sample_rate.txt
The data file can then plotted with a graphing program or parsed with a shell
script. It can be insightful to watch the sample rate accuracy improve
and converge over time, watch the 24 hour thermal cycle of the clocks in
action, or monitor the effects of NTP on the
system clock. A significant observation worth noticing is that the change
of time is not constant. System d/dt is a variable. This seemingly
absurd statement can have a major impact on baudline frequency and time
measurement when high accuracy is desired.
To use this feature open the Input Devices and/or the Output Devices windows
(iconified is OK).
An absolute UTC anchor time is printed in the header comment.
The first column is the time in seconds since sample rate estimation
started. The following columns are the sample rate estimates of the
active channels.
The output speed of this command prints at a rate of about three times per
second. This rate can be lowered to print only once per minute, hour, or
day with the -debugtimer command line option.
|
|
|
|
-debugmeasure |
Print out a stream of measurement data to stderr. This option is useful
for logging measurement data to a
numeric text file. The data file can then plotted with a graphing program
or parsed with a shell script. Real-time measurement data analysis is
even possible. Note that "|&" only works with certain shells like
tcsh. See these stderr redirecting and piping commands:
- baudline -debugmeasure >& measurements.txt
- baudline -debugmeasure |& measurement_stream_analyzer
To use this measurement logging feature first open some measurement windows of
interest. Next measurement data will stream to stderr while in the record
or play modes. Also any measurement data from a paste command will print
to stderr. A #comment header line will print at mode transitions that
labels the meaning of the different numeric data columns.
An absolute UTC anchor time is printed in the header comment.
The first column is the time in seconds since measurement logging
started. The following columns are values from the active measurement
windows. Note that the printed values are the same as the values
displayed in the measurement windows so the
record averaging menu option
will also control the measurement variance. The output speed of this
command prints at a line rate equal to baudline's current frame rate
(FPS). This rate can be very high and it
can vary dramatically based on system load. The
-debugtimer command line option can be used to
control the output data rate.
|
|
|
|
-debugtimer |
Control the time in milliseconds between the printing of the
-debugrate and the
-debugmeasure data streams. This command is
useful for lowering the data output rate. The usage format is
"-debugtimer ms" where ms is an integer milliseconds value.
Here are two examples of how to use the -debugtimer command. The first
command will print out the sample rate estimates once an hour. The
second command will print the measurement data once every ten seconds:
- baudline -debugrate -debugtimer 3600000
- baudline -debugmeasure -debugtimer 10000
|
|
|
|
|